01 : Hierarchical/Flat Netlist Extraction
Minimum Required Versions: Expert 5.2204.3.R, Hipex 3.8.7.R
This example demonstrates running Hipex Netlist Extraction on a layout in the Expert interactive layout environment
1: Setting up Hipex with Expert
First start the Expert layout editor(either with the command expert or by clicking the "Expert" icon). From the main menu bar at the top, click File->Open to pop up the Load Project menu, navigate to the directory into which the hipex_ex01.eld design database file was downloaded and Open it. This will call up the Open Cell(s) menus, and here double-click mux4, the top-level cell. By default this shows the hierarchical view of the design; you can see the full details ( figure1 ) by clicking View->Cell View->Flat.
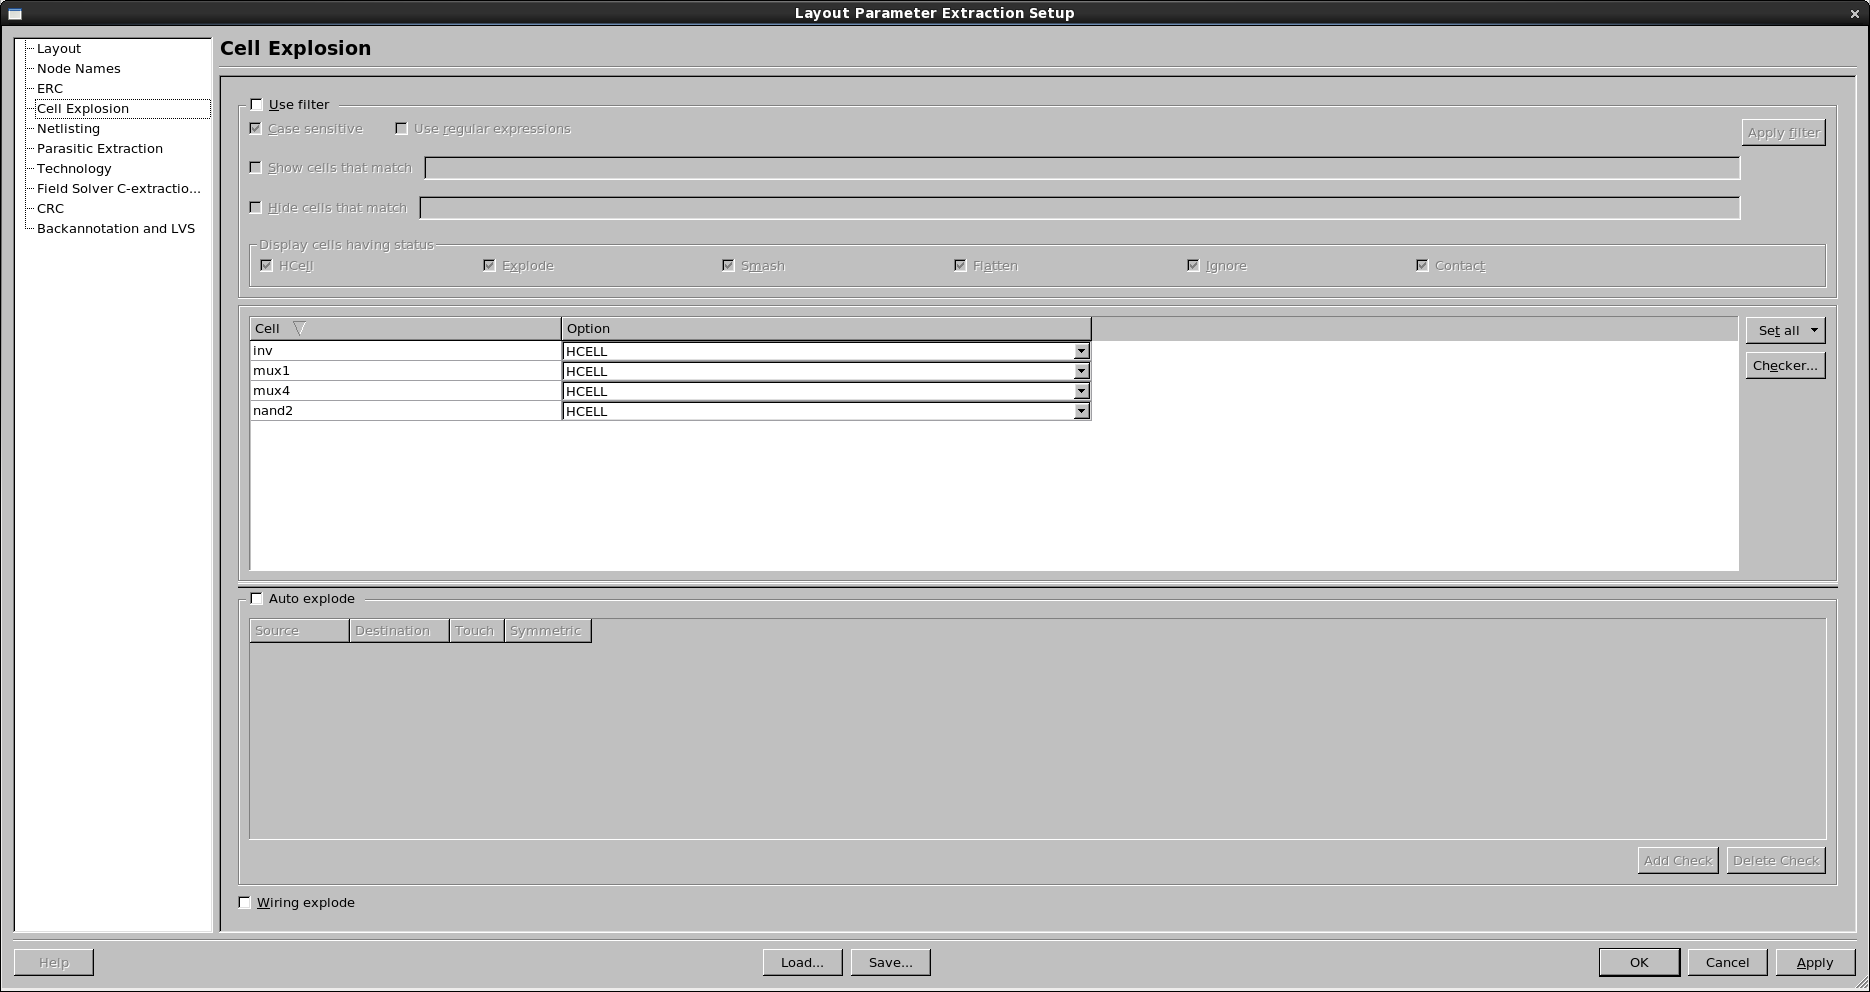
The next step is to load the required Hipex technology files and change any settings to customize the extraction. From the main Expert menu, click Verification->Extraction->Setup ; this pops up the "Layout Parameter Extraction Setup" panel (see figure2 with Cell Explosion page shown). The pages within this panel are accessed using the menu on the left.
The first page, Layout , shows the Database file and Top cell; by default these are set to the currently open database and cell. The second page, Node Names , controls how instance and net names are derived. Specifying Global node names (eg, VSS for Ground) will cause those names to be declared as *.GLOBAL in the extracted netlist. The third page, ERC , controls the ERC checks (eg. Opens, shorts) which are done during the extraction; for example you might want to disable reporting of dangling nodes if there are a lot of them and they are know to be harmless. The fourth page, Cell Explosion , controls the extraction of the design hierarchy. You can control the hierarchy for individual cells; this can be useful if, for example, a layout is made up of lots of smaller leaf cells which you do not want shown individually in the extracted netlist, or if individual circuit devices are constructed from several subcells which cannot be extracted separately. The default is to EXPLODE all cells, which has the effect of producing a flat netlist in this simple example; to create a fully hierarchical netlist, click Set all->Hcell. The fifth page, Netlisting, controls the details of the extracted netlists and parasitic files which will be generated. Default filenames for all the possible types of output are generated based of the current design/cell; you can change these and/or set options, for example to output the source/drain areas/perimeter or set a threshold on parasitic capacitances to be shown. Note that this page only controls the details of the output; if does not enable or initiate the actual generation of the output files; this is done at a later stage. The seventh page, Technology, is where you need to specify the technology files for the extractions. For Derived layer generation , select Use external script ,and use the file browser to specify the hipex_ex01_lvs.dsf file previously downloaded. This file controls the generation of device recognition layers from the drawn/mask layers. The other sections are only used for parasitic extraction.
The remained four pages, Parasitic Extraction, Field Solver C-extraction (Stellar), CRC and Backannotation and LVS , specify more advanced options for parasitic extraction
Upon completion all required pages, click OK in the Layout Parameter Extraction Setup Panel.
2: Hipex Net Extraction
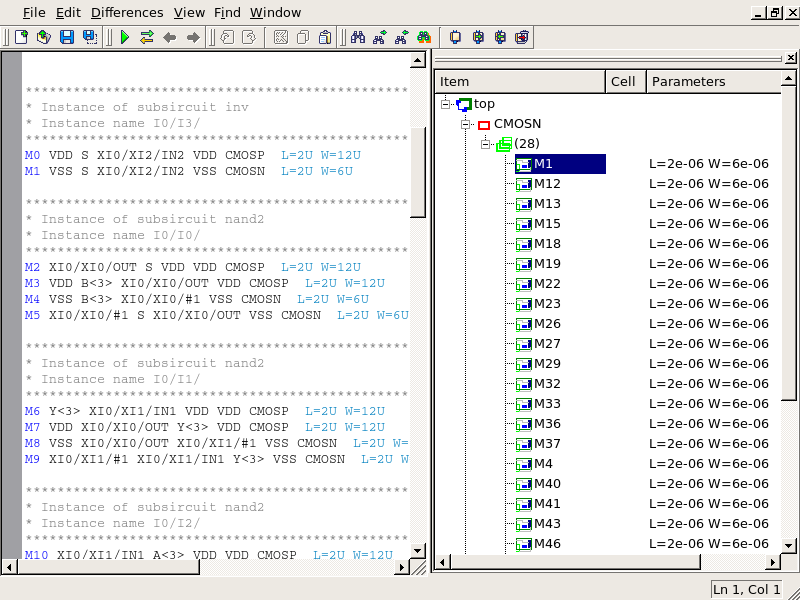
The netlist extraction can now be run, with Verification->Extraction->Hipex-Net->Run from the main Expert window. This step is necessary even if only the parasitics are required, because the full connectivity must first be extracted to identify all the nodes. When the netlist extraction has completed a window will popup, inviting you to Close, Open Netlist or Show Detail (ie. show the run log). The Open Netlist option is worth noting; rather than simply showing a text netlist, it opens a Netlist Editor window (see figure3 ), and shows both the text netlist (on the left) and a hierarchy display (on the right). These are linked; clicking on a device in the hierarchy display will highlight the corresponding item in the text netlist. It is also linked to the layout, so clicking on the item in the hierarchy display will also jump to the relevant cell in the Expert layout editor.
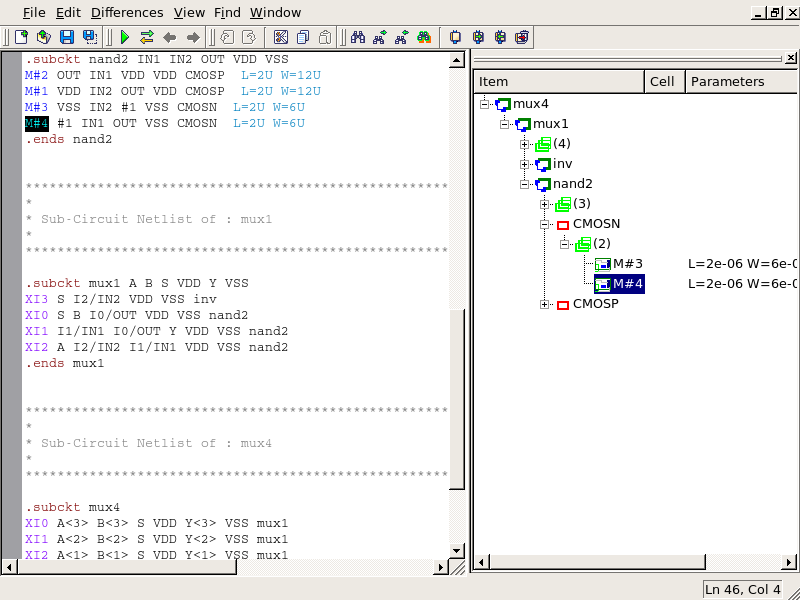
It should be noted that there are actually two steps internally for the net extraction; the first step creates a device/connectivity database from the layout and the second step is to create a netlist from this database. It is possible to re-run the second step, the netlist generation, separately, once the device/connectivity database has been created. This step can have different options from the first netlist which is created by default. In settings for this example we set Cell Explosion to Hcell (fully hierarchical), and Hipex generated fully hierarchical netlist. But now we can also create a separate flat netlist with Verification->Extraction->Netlister->Flat Spice Netlist . The netlist created by this command (see figure4 ) is flat, but because it was generated from the hierarchical device/connectivity database, it is shown with hierarchical netnames and commented to show the hierarchical source of each device. If, on the other hand, we had left Cell Explosion as Explode , the device/connectivity database would be flat and the resulting netlist would always be flat with no hierarchy information.
NOTE. Most of these netlist operations can also be accessed directly from icons in the menu bars, rather than using the cascading menu commands shown in this text. These icons are not shown by default, but can be enabled easily by Right clicking anywhere in the main Expert toolbars and selecting Toolbars->LPE . In fact, any of the groups of icons for different operations can be enabled/disabled in this way, and by Left-clicking and holding on the small vertical bars in each group of icons, can also be detached and moved anywhere else within the expert window or even outside to the desktop.
hipex_ex01_lvs.dsf
											Layers:
    N_WELL   (42   /* Original */)
,   P_WELL   (59   /* Original */)
,   ACTIVE   (43   /* Original */)
,   THICK_ACTIVE   (60   /* Original */)
,   PBASE   (58   /* Original */)
,   POLY_CAP1   (28   /* Original */)
,   POLY   (46   /* Original */)
,   SILICIDE_BLOCK   (29   /* Original */)
,   N_PLUS_SELECT   (45   /* Original */)
,   P_PLUS_SELECT   (44   /* Original */)
,   POLY2   (56   /* Original */)
,   HI_RES_IMPLANT   (34   /* Original */)
,   CONTACT   (25   /* Original */)
,   METAL1   (49   /* Original */)
,   VIA   (50   /* Original */)
,   METAL2   (51   /* Original */)
,   VIA2   (61   /* Original */)
,   METAL3   (62   /* Original */)
,   VIA3   (30   /* Original */)
,   METAL4   (31   /* Original */)
,   CAP_TOP_METAL   (35   /* Original */)
,   VIA4   (32   /* Original */)
,   METAL5   (33   /* Original */)
,   VIA5   (36   /* Original */)
,   METAL6   (37   /* Original */)
,   DEEP_N_WELL   (38   /* Original */)
,   GLASS   (52   /* Original */)
,   PADS   (26   /* Original */)
,   RES_ID   (1, 0   /* Original */)
,   INDDMY_ID   (2, 0   /* Original */)
;

/*    1 */ free_layer_definition_order: yes;
/*    2 */ Merge_Input: on;
/*    3 */ Database_Precision: 1000;
/*    4 */ Grid_Resolution: GridX = 1, GridY = 1;
/*    5 */ Unit: 1um;
/*    6 */ Incremental_Connect: no;
/*    7 */ Update_layout: input=no, technology=no, new=no, layers=
(pnp_id,pnp_e,pnp_c,npn_e,npn_b,gate,p_sd,n_sd,cmosp_id,cmosn_id,hvcmosp_id,
hvpmos_d,hvnmos_s,rpplus_id,rnpoly_id,rpoly_id,rnwell_id,rpplus_pin,connect_poly,
connect_nwell,substrate,sub_tie,well_tie,deepnwell_tie,p1p2_id,poly_con,poly2cap_con,
ind_id,connect_metal1,ind_plus,ind_minus,NR_counter,width,space,radius
);

Select: Layer1=PBASE, Layer2=N_PLUS_SELECT, LayerR=&PNP_PBASE, Relation=overlap, options=(not);
UnderSize: Value=1um, Layer=&PNP_PBASE, LayerR=&A;
Logicform: pnp_id=&A.dif.(ACTIVE);

Contours: Layer=pnp_id, LayerR=pnp_e, options=(holes);
Logicform: pnp_c=PBASE.and.ACTIVE.dif.(pnp_e.or.P_PLUS_SELECT.or.N_PLUS_SELECT);

Logicform: npn_e=PBASE.and.N_PLUS_SELECT.AND.ACTIVE;
LogicForm: npn_b=PBASE.and.ACTIVE.and.P_PLUS_SELECT;
Logicform: gate=POLY.and.ACTIVE;
Logicform: p_sd=(P_PLUS_SELECT.and.ACTIVE.AND.N_WELL).dif.(POLY.or.DEEP_N_WELL.or.RES_ID);
Logicform: n_sd=(N_PLUS_SELECT.and.ACTIVE).dif.(POLY.or.THICK_ACTIVE.or.N_WELL);
Logicform: cmosp_id=gate.and.P_PLUS_SELECT.and.N_WELL;
Logicform: cmosn_id=gate.and.N_PLUS_SELECT.dif.THICK_ACTIVE;
Logicform: hvcmosp_id=gate.and.P_PLUS_SELECT.and.THICK_ACTIVE.dif.P_WELL;
Select: Layer1=ACTIVE, Layer2=hvcmosp_id, Relation=overlap, LayerR=&A1;
Logicform: hvpmos_d=&A1.dif.(POLY.or.P_WELL.or.N_WELL);
Select: Layer1=ACTIVE, Layer2=hvcmosp_id, Relation=overlap, LayerR=&A2;
Logicform: hvpmos_s=&A2.dif.(hvcmosp_id.or.N_WELL.or.hvpmos_d);
Logicform: hvcmosn_id=gate.and.N_PLUS_SELECT.and.THICK_ACTIVE;
Select: Layer1=ACTIVE, Layer2=hvcmosn_id, Relation=overlap, LayerR=&A3;
Logicform: hvnmos_d=&A3.dif.(POLY.or.P_PLUS_SELECT.or.N_WELL);
Select: Layer1=ACTIVE, Layer2=hvcmosn_id, Relation=overlap, LayerR=&A4;
Logicform: hvnmos_s=&A4.dif.(hvcmosn_id.or.hvnmos_d.or.P_PLUS_SELECT);
Logicform: rpplus_id=N_WELL.and.P_PLUS_SELECT.and.ACTIVE.and.RES_ID;
Logicform: rnpoly_id=N_PLUS_SELECT.and.POLY.and.RES_ID;
Logicform: rpoly_id=(POLY.and.RES_ID).dif.N_PLUS_SELECT;
Logicform: rnwell_id=(N_WELL.and.RES_ID).dif.P_PLUS_SELECT;
LogicForm: &rpplus_pin1=(ACTIVE.and.P_PLUS_SELECT).dif.RES_ID;
Select: Relation=touch, Layer1=&rpplus_pin1, Layer2=rpplus_id, LayerR=rpplus_pin;
Logicform: connect_poly=POLY.dif.(RES_ID.or.POLY2);
Logicform: connect_nwell=N_WELL.dif.(RES_ID);
Substrate: LayerR=substrate;
Logicform: sub_tie=(ACTIVE.AND.P_PLUS_SELECT).dif.(DEEP_N_WELL.or.N_WELL);
Logicform: well_tie=(ACTIVE.AND.N_PLUS_SELECT.AND.N_WELL).dif.npn_e;
Logicform: &deepnwell_tie1=ACTIVE.AND.N_PLUS_SELECT.AND.DEEP_N_WELL;
Select: Relation=touch, Layer1=&deepnwell_tie1, Layer2=hvpmos_s, LayerR=&tempA;
LogicForm: deepnwell_tie=&deepnwell_tie1.dif.&tempA;
Logicform: p1p2_id=(POLY2.and.POLY).dif.ACTIVE;
Logicform: poly_con=(POLY.dif.POLY2).and.CONTACT;
Logicform: poly2cap_con=POLY.AND.POLY2.and.CONTACT;

LogicForm: &ind_id1=METAL1.and.INDDMY_ID;
PERIMETER: Layer=&ind_id1, Value=75, Type=GT, LayerR=ind_id;
select: relation=vertex, Layer=METAL1, Options=(5:99999), LayerR=&metal1;
//LogicForm: connect_metal1=&metal1.dif.ind_id;
Corner: Layer=ind_id, Value=0.1, Options=(INSIDE,A90),LayerR=&temp11;
Select: Relation=flush, Layer1=&temp11, Layer2=INDDMY_ID, LayerR=&temp2;
Size: Layer=&temp2, within=ind_id, Options=(cut), step=0.5, Value=10, LayerR=ind_plus;
Corner: Layer=ind_id, Value=0.2, Options=(inside,A90), LayerR=&temp12;
Size: Layer=&temp12, within=ind_id, Options=(cut), step=0.5, Value=10, LayerR=&temp;
//Select: Relation=flush, Layer1=&temp, Layer2=INDDMY_ID, LayerR=ind_minus, Options=(not);
//Added new by AK 09/10/08
Select: Relation=vertex, Layer=&ind_id1, Options=(1:4), LayerR=&ind_minus1;
LogicForm: ind_minus2=METAL2.and.INDDMY_ID.and.&ind_minus1;
LogicForm: connect_metal1=(METAL1.dif.ind_id); //so that the 4-vertex M1 piece inside INDDMY will also get connectivity
Select: Relation=overlap, Layer1=METAL2, Layer2=ind_id, LayerR=ind_minus;


//New code ends

Corner: Layer=ind_id, Value=0.1, Options=(inside,any), LayerR=NR_counter;
LogicForm: width=(METAL1.and.METAL2.and.INDDMY_ID).dif.ind_minus2;
LogicForm: &space1=(METAL2.and.INDDMY_ID).dif.METAL1;
PERIMETER: Layer=&space1, LayerR=&space2, Value=79, Type=LT;
SELECT: Relation=touch, layer1=&space2, Layer2=ind_id, LayerR=&space3;
SELECT_edges: Relation=coincide, layer1=&space3, Layer2=ind_id, LayerR=&space4;
SELECT: Relation=touch, layer1=&space3, Layer2=&space4, LayerR=space, options=(2:2);
LogicForm: &space1A=(METAL2.and.INDDMY_ID).dif.METAL1;
PERIMETER: Layer=&space1A, LayerR=radius, Value=80, Type=GE;
hipex_ex01_net_cmd.lisa
											!--------------------------------------------------------------------
!Net command file
!DESIGN    : design
!TECHNO    : techno
!USER      :
!TIME      : Sat May 30 01:08:13 2020

!--------------------------------------------------------------------

! HIPEX to CUP map table

cup layer "metal4" /hipex_layer="METAL4";
cup layer "metal5" /hipex_layer="METAL5";
cup layer "metal6" /hipex_layer="METAL6";
cup layer "metal2" /hipex_layer="METAL2";
cup layer "metal3" /hipex_layer="METAL3";
cup layer "poly1" /hipex_layer="connect_poly";
cup layer "substrate" /hipex_layer="substrate";
cup layer "metal1" /hipex_layer="connect_metal1";

! GDS LAYER MAP

hipex layer /gds_layer=   0 /gds_type= 0 /geom_layer="pnp_id";
hipex layer /gds_layer=  25 /gds_type= 0 /geom_layer="CONTACT";
hipex layer /gds_layer=  30 /gds_type= 0 /geom_layer="VIA3";
hipex layer /gds_layer=  31 /gds_type= 0 /geom_layer="METAL4";
hipex layer /gds_layer=  31 /gds_type= 6 /geom_layer="METAL4_port_text" /text_layer="METAL4_port_text_HPX_TEXT";
hipex layer /gds_layer=  32 /gds_type= 0 /geom_layer="VIA4";
hipex layer /gds_layer=  33 /gds_type= 0 /geom_layer="METAL5";
hipex layer /gds_layer=  33 /gds_type= 6 /geom_layer="METAL5_port_text" /text_layer="METAL5_port_text_HPX_TEXT";
hipex layer /gds_layer=  36 /gds_type= 0 /geom_layer="VIA5";
hipex layer /gds_layer=  37 /gds_type= 0 /geom_layer="METAL6";
hipex layer /gds_layer=  37 /gds_type= 6 /geom_layer="METAL6_port_text" /text_layer="METAL6_port_text_HPX_TEXT";
hipex layer /gds_layer=  38 /gds_type= 0 /geom_layer="DEEP_N_WELL";
hipex layer /gds_layer=  42 /gds_type= 5 /geom_layer="NWEL_port";
hipex layer /gds_layer=  46 /gds_type= 5 /geom_layer="GC_port";
hipex layer /gds_layer=  49 /gds_type= 1 /text_layer="M1_LABEL";
hipex layer /gds_layer=  49 /gds_type= 5 /geom_layer="METAL1_port";
hipex layer /gds_layer=  49 /gds_type= 6 /geom_layer="METAL1_port_text" /text_layer="METAL1_port_text_HPX_TEXT";
hipex layer /gds_layer=  50 /gds_type= 0 /geom_layer="VIA";
hipex layer /gds_layer=  51 /gds_type= 0 /geom_layer="METAL2";
hipex layer /gds_layer=  51 /gds_type= 1 /geom_layer="M2_LABEL";
hipex layer /gds_layer=  51 /gds_type= 5 /geom_layer="METAL2_port";
hipex layer /gds_layer=  51 /gds_type= 6 /geom_layer="METAL2_port_text" /text_layer="METAL2_port_text_HPX_TEXT";
hipex layer /gds_layer=  56 /gds_type= 0 /geom_layer="POLY2";
hipex layer /gds_layer=  58 /gds_type= 0 /geom_layer="PBASE";
hipex layer /gds_layer=  59 /gds_type= 5 /geom_layer="PSUB_port";
hipex layer /gds_layer=  61 /gds_type= 0 /geom_layer="VIA2";
hipex layer /gds_layer=  62 /gds_type= 0 /geom_layer="METAL3";
hipex layer /gds_layer=  62 /gds_type= 6 /geom_layer="METAL3_port_text" /text_layer="METAL3_port_text_HPX_TEXT";
hipex layer /gds_layer=  63 /gds_type= 0 /geom_layer="pnp_e";
hipex layer /gds_layer=  64 /gds_type= 0 /geom_layer="pnp_c";
hipex layer /gds_layer=  65 /gds_type= 0 /geom_layer="npn_e";
hipex layer /gds_layer=  66 /gds_type= 0 /geom_layer="npn_b";
hipex layer /gds_layer=  67 /gds_type= 0 /geom_layer="p_sd";
hipex layer /gds_layer=  68 /gds_type= 0 /geom_layer="n_sd";
hipex layer /gds_layer=  69 /gds_type= 0 /geom_layer="cmosp_id";
hipex layer /gds_layer=  70 /gds_type= 0 /geom_layer="cmosn_id";
hipex layer /gds_layer=  71 /gds_type= 0 /geom_layer="hvcmosp_id";
hipex layer /gds_layer=  72 /gds_type= 0 /geom_layer="hvpmos_d";
hipex layer /gds_layer=  73 /gds_type= 0 /geom_layer="hvpmos_s";
hipex layer /gds_layer=  74 /gds_type= 0 /geom_layer="hvcmosn_id";
hipex layer /gds_layer=  75 /gds_type= 0 /geom_layer="hvnmos_d";
hipex layer /gds_layer=  76 /gds_type= 0 /geom_layer="hvnmos_s";
hipex layer /gds_layer=  77 /gds_type= 0 /geom_layer="rpplus_id";
hipex layer /gds_layer=  78 /gds_type= 0 /geom_layer="rnpoly_id";
hipex layer /gds_layer=  79 /gds_type= 0 /geom_layer="rpoly_id";
hipex layer /gds_layer=  80 /gds_type= 0 /geom_layer="rnwell_id";
hipex layer /gds_layer=  81 /gds_type= 0 /geom_layer="rpplus_pin";
hipex layer /gds_layer=  82 /gds_type= 0 /geom_layer="connect_poly";
hipex layer /gds_layer=  83 /gds_type= 0 /geom_layer="connect_nwell";
hipex layer /gds_layer=  84 /gds_type= 0 /geom_layer="substrate";
hipex layer /gds_layer=  85 /gds_type= 0 /geom_layer="sub_tie";
hipex layer /gds_layer=  86 /gds_type= 0 /geom_layer="well_tie";
hipex layer /gds_layer=  87 /gds_type= 0 /geom_layer="deepnwell_tie";
hipex layer /gds_layer=  88 /gds_type= 0 /geom_layer="p1p2_id";
hipex layer /gds_layer=  89 /gds_type= 0 /geom_layer="poly_con";
hipex layer /gds_layer=  90 /gds_type= 0 /geom_layer="poly2cap_con";
hipex layer /gds_layer=  91 /gds_type= 0 /geom_layer="ind_plus";
hipex layer /gds_layer=  92 /gds_type= 0 /geom_layer="ind_minus";
hipex layer /gds_layer=  93 /gds_type=255 /geom_layer="connect_metal1";
hipex layer /gds_layer=  94 /gds_type= 0 /geom_layer="HPX$npn_e";

! TEXT TYPES


! PORT LAYERS

hipex port_layer "METAL1_port_text_HPX_TEXT";
copy_ "METAL1_port_text" "METAL1_port_text_HPX_PORT$";
hipex port_layer "METAL1_port_text_HPX_PORT$" {"METAL1_port_text"};
hipex port_layer "METAL2_port_text_HPX_TEXT";
copy_ "METAL2_port_text" "METAL2_port_text_HPX_PORT$";
hipex port_layer "METAL2_port_text_HPX_PORT$" {"METAL2_port_text"};
hipex port_layer "METAL3_port_text_HPX_TEXT";
copy_ "METAL3_port_text" "METAL3_port_text_HPX_PORT$";
hipex port_layer "METAL3_port_text_HPX_PORT$" {"METAL3_port_text"};
hipex port_layer "METAL4_port_text_HPX_TEXT";
copy_ "METAL4_port_text" "METAL4_port_text_HPX_PORT$";
hipex port_layer "METAL4_port_text_HPX_PORT$" {"METAL4_port_text"};
hipex port_layer "METAL5_port_text_HPX_TEXT";
copy_ "METAL5_port_text" "METAL5_port_text_HPX_PORT$";
hipex port_layer "METAL5_port_text_HPX_PORT$" {"METAL5_port_text"};
hipex port_layer "METAL6_port_text_HPX_TEXT";
copy_ "METAL6_port_text" "METAL6_port_text_HPX_PORT$";
hipex port_layer "METAL6_port_text_HPX_PORT$" {"METAL6_port_text"};

! SOFT LAYERS


! MISC (optional) statementsS


! CONNECTIVITY

hipex connect "DEEP_N_WELL" "deepnwell_tie";
hipex connect "GC_port" "connect_poly";
hipex connect "M2_LABEL" "ind_minus";
hipex attach "METAL1_port_text_HPX_TEXT" "METAL1_port_text";
hipex connect "METAL2" "METAL2_port_text";
hipex connect "METAL2" "METAL2_port";
hipex connect "METAL2" "METAL3" /contact="VIA2";
hipex attach "METAL2_port_text_HPX_TEXT" "METAL2";
hipex attach "METAL2_port_text_HPX_TEXT" "METAL2_port_text";
hipex connect "METAL3" "METAL3_port_text";
hipex connect "METAL3" "METAL4" /contact="VIA3";
hipex attach "METAL3_port_text_HPX_TEXT" "METAL3";
hipex attach "METAL3_port_text_HPX_TEXT" "METAL3_port_text";
hipex connect "METAL4" "METAL4_port_text";
hipex connect "METAL4" "METAL5" /contact="VIA4";
hipex attach "METAL4_port_text_HPX_TEXT" "METAL4";
hipex attach "METAL4_port_text_HPX_TEXT" "METAL4_port_text";
hipex connect "METAL5" "METAL5_port_text";
hipex connect "METAL5" "METAL6" /contact="VIA5";
hipex attach "METAL5_port_text_HPX_TEXT" "METAL5";
hipex attach "METAL5_port_text_HPX_TEXT" "METAL5_port_text";
hipex connect "METAL6" "METAL6_port_text";
hipex attach "METAL6_port_text_HPX_TEXT" "METAL6";
hipex attach "METAL6_port_text_HPX_TEXT" "METAL6_port_text";
hipex connect "NWEL_port" "connect_nwell";
hipex connect "PBASE" "npn_b";
hipex connect "PSUB_port" "substrate";
hipex connect "connect_metal1" "POLY2" /contact="poly2cap_con";
hipex connect "connect_metal1" "METAL1_port_text";
hipex connect "connect_metal1" "METAL1_port";
hipex connect "connect_metal1" "METAL2" /contact="VIA";
hipex connect "connect_metal1" "pnp_e" /contact="CONTACT";
hipex connect "connect_metal1" "pnp_c" /contact="CONTACT";
hipex connect "connect_metal1" "npn_e" /contact="CONTACT";
hipex connect "connect_metal1" "npn_b" /contact="CONTACT";
hipex connect "connect_metal1" "p_sd" /contact="CONTACT";
hipex connect "connect_metal1" "n_sd" /contact="CONTACT";
hipex connect "connect_metal1" "hvpmos_d" /contact="CONTACT";
hipex connect "connect_metal1" "hvpmos_s" /contact="CONTACT";
hipex connect "connect_metal1" "hvnmos_d" /contact="CONTACT";
hipex connect "connect_metal1" "hvnmos_s" /contact="CONTACT";
hipex connect "connect_metal1" "rpplus_pin" /contact="CONTACT";
hipex connect "connect_metal1" "connect_poly" /contact="poly_con";
hipex connect "connect_metal1" "sub_tie" /contact="CONTACT";
hipex connect "connect_metal1" "well_tie" /contact="CONTACT";
hipex connect "connect_metal1" "ind_plus";
hipex connect "connect_metal1" "ind_minus";
hipex attach "M1_LABEL" "connect_metal1";
hipex attach "METAL1_port_text_HPX_TEXT" "connect_metal1";
hipex connect "connect_nwell" "well_tie";
hipex connect "deepnwell_tie" "connect_metal1" /contact="CONTACT";
hipex connect "substrate" "sub_tie";

! DEVICES TEXTS


! DEVICE DEFINITIONS

hipex define_device PMOS "cmosp_id" /drain="p_sd" /gate="connect_poly" /source="p_sd" /subs="connect_nwell" /model_name="CMOSP";
hipex define_device NMOS "cmosn_id" /drain="n_sd" /gate="connect_poly" /source="n_sd" /subs="substrate" /model_name="CMOSN";
hipex define_device C "p1p2_id" /pin1="POLY2" /pin2="connect_poly" /area_cap=0.0075 /perim_cap=0.00625 /model_name="PIPCAP";
hipex define_device PMOS "hvcmosp_id" /drain="hvpmos_d" /gate="connect_poly" /source="hvpmos_s" /subs="DEEP_N_WELL" /model_name="HVCMOSP";
hipex define_device NMOS "hvcmosn_id" /drain="hvnmos_d" /gate="connect_poly" /source="hvnmos_s" /subs="substrate" /model_name="HVCMOSN";
hipex define_device NPN "HPX$npn_e" /collector="connect_nwell" /base="PBASE" /emitter="npn_e" /subs="substrate" /area_unit=36 /model_name="NPN";
hipex define_device PNP "pnp_id" /collector="pnp_c" /base="connect_nwell" /emitter="pnp_e" /area_unit=38.3819 /model_name="PNP";
hipex define_device R "rnwell_id" /pin1="connect_nwell" /pin2="connect_nwell" /subs="substrate" /cont_res=0 /delta_l=0.4 /delta_w=-0.02 /head_res=0 /sheet_res=10000 /model_name="RNWELL";
hipex define_device R "rpplus_id" /pin1="rpplus_pin" /pin2="rpplus_pin" /subs="connect_nwell" /cont_res=0 /delta_l=0.5 /delta_w=-0.05 /head_res=0 /sheet_res=200 /model_name="RPPLUS";
hipex define_device R "rnpoly_id" /pin1="connect_poly" /pin2="connect_poly" /cont_res=0 /delta_l=0.4 /delta_w=0.02 /head_res=0 /sheet_res=50 /model_name="RNPOLY";
hipex define_device R "rpoly_id" /pin1="connect_poly" /pin2="connect_poly" /cont_res=0 /delta_l=0.4 /delta_w=0.02 /head_res=0 /sheet_res=50 /model_name="RPOLY";

! GEOMETRICAL OPERATIONS

    hipex copy "npn_e" "HPX$npn_e";


! SOFT/WELL CHECKS


! MASKED DIELECTRIC LAYERS
hipex_ex01_opt.lisa
											!--------------------------------------------------------------------
!Run file
!DESIGN    : design
!TECHNO    : techno
!USER      :
!TIME      : Sat May 30 01:08:13 2020

!--------------------------------------------------------------------
TOP_CELL                                = "mux4";

HIPEX_DB_DIRECTORY                      = "database";
!--------------------------------------------------------------------
!Extraction: LISA template command file
!--------------------------------------------------------------------

!--------------------------------------------------------------------
!Layout parameters
!--------------------------------------------------------------------
HIPEX_LAYOUT_FORMAT                     = "GDS";
HIPEX_LAYOUT_FILE                       = "mux4$HPX.gds";
HIPEX_OVERLAP_INSTANCE_CHECK            = "NO";
HIPEX_SUPPRESS_NOTEMPTY                 = "YES";
HIPEX_NON45_FLAG                        = "NO";

!--------------------------------------------------------------------
!Connectivity parameters
!--------------------------------------------------------------------
HIPEX_TERNARY_CONNECT_THROUGH_TOUCH     = "NO";

!--------------------------------------------------------------------
!Output parameters
!--------------------------------------------------------------------
HIPEX_COMMENT_MODEL                     = "NO";
HIPEX_COMMENT_TOP_SUBCKT                = "NO";
HIPEX_HIER_SPICE_WL_NAME                = "/home/alexa/2020_06/01/mux4_hier.spice";
HIPEX_MOSFET_LW_ONLY                    = "NO";
HIPEX_MOSFET_EXCLUDE_W_SD               = "NO";
HIPEX_OUTPUT_SPICE_ATTRIBUTES           = "YES";
HIPEX_CAP_OUTPUT_LW                     = "NO";
HIPEX_RES_OUTPUT_LW                     = "YES";
HIPEX_CAP_OUTPUT_AREA_PERIMETER         = "YES";
HIPEX_OUTPUT_SPICE_FORMAT               = "HSPICE";
HIPEX_PININFO                           = "NO";
HIPEX_PRINT_MESSAGES                    = "NO";
NETLIST_OUTPUT_PM                       = "NO";
NETLIST_DISTRIBUTION_MODE               = "ACCURATE";
NETLIST_LINE_LENGTH                     = 80;
NETLIST_EXCLUDE_LIBRARY_PREFIX          = "NO";
NETLIST_GLOBALS_IN_SUBCKT_PINS          = "YES";
NETLIST_TEXTED_PINS                     = "YES";
NETLIST_LIBRARIES                       = {};

!--------------------------------------------------------------------
!ERC parameters
!--------------------------------------------------------------------
HIPEX_DANGLE_FLAG                       = "YES";
HIPEX_CAP_MESSAGE                       = "NO";
HIPEX_DIODE_MESSAGE                     = "NO";
HIPEX_RENAME_OPENS                      = "NO";
HIPEX_MULTILABEL_NAME                   = "";
HIPEX_SOFTCHECK_WARNINGS_AS_ERRORS      = "NO";

!--------------------------------------------------------------------
!Node Name parameters
!--------------------------------------------------------------------
HIPEX_HIERARCHY_SEPARATOR               = "/";
HIPEX_NODE_NAME_SEPARATOR               = "_";
HIPEX_DEFAULT_INSTANCE_PREFIX           = "I";
HIPEX_DEFAULT_NODE_PREFIX               = "#";
HIPEX_DELETE_BAD_CHAR                   = "NO";
HIPEX_XY_LOCATION                       = "NO";
HIPEX_CASE_SENSITIVE_NET_NAMES          = "YES";
HIPEX_AUTOGENERATE_LOCAL                = "YES";
POWER_NODE                              = {"VDD"};
GROUND_NODE                             = {"VSS"};
GLOBAL_TEXT_LIST                        = {"VDD", "VSS"};
HIPEX_PIN_DELIMITER                     = ":";

!--------------------------------------------------------------------
!Explosion parameters
!--------------------------------------------------------------------
HIPEX_WIRING_EXPLODE                    = "NO";
HIPEX_KEEP_FLATTEN_CELLS                = "YES";
HIPEX_TEXT_TOP                          = "NO";
HIPEX_AUTO_EXPLODE                      = "NO";

!--------------------------------------------------------------------
!Pins parameters
!--------------------------------------------------------------------
HIPEX_IGNORE_DANGLE_PINS                = "NO";

!--------------------------------------------------------------------
!BackAnnotate parameters
!--------------------------------------------------------------------
HIPEX_BACKANNOTATE                      = "NO";

!--------------------------------------------------------------------
!Capacitance Extraction parameters
!--------------------------------------------------------------------
CPX_COUPLED_THRESHOLD                   = 0.0;
CPX_EXTRACT_DANGLES                     = "NO";
CPX_OUTPUT_DUMMY_CAPA                   = "NO";
CPX_FIELD_SOLVER                        = "NO";

!--------------------------------------------------------------------
!Field Solver C-extraction (Stellar) parameters
!--------------------------------------------------------------------
CPX_STEP_X                              = 0.5;
CPX_STEP_Y                              = 0.5;
CPX_STEP_Z                              = 0.5;
CPX_PRECISION                           = 0.01;
CPX_MAX_ITER                            = 100;
CPX_DECOMPOSITION                       = "YES";
CPX_DEC_STEP                            = "NO";
CPX_DEC_VALUE                           = -1.0;
CPX_BOX                                 = "NO";
CPX_BOX_VALUES_XMIN                     = 0.0;
CPX_BOX_VALUES_XMAX                     = 0.0;
CPX_BOX_VALUES_YMIN                     = 0.0;
CPX_BOX_VALUES_YMAX                     = 0.0;
CPX_FILTER                              = "NO";
CPX_CAPA_MIN                            = 1e-20;
CPX_RENEW                               = "NO";
CPX_SAVE_FILE                           = "/home/alexa/2020_06/01/RenewSavedFile.sav";
CPX_THREED_GENERATION                   = "NO";
CPX_THREED_FILENAME                     = "/home/alexa/2020_06/01/3DStructureFile.str";

!--------------------------------------------------------------------
!Field Solver C-extraction (Clever) parameters
!--------------------------------------------------------------------

!--------------------------------------------------------------------
!Resistance Extraction parameters
!--------------------------------------------------------------------
RPX_SERIAL_MERGE_THRESHOLD              = 0.0;
RPX_OUTPUT_XY                           = "YES";
RPX_OUTPUT_LAYER_NAMES                  = "YES";
RPX_SKIP_POWER                          = "YES";
RPX_USE_TEXTS_AS_SUBNODES               = "NO";
RPX_USE_FIELD_SOLVER                    = "NO";

!--------------------------------------------------------------------
!Netlist RC Reduction parameters
!--------------------------------------------------------------------
NETLIST_CRC                             = "NO";

!--------------------------------------------------------------------
!Coefficient Units parameters
!--------------------------------------------------------------------
HIPEX SET_UNIT /CAPACITANCE "pF";
HIPEX SET_UNIT /RESISTANCE "Ohm";
HIPEX SET_UNIT /LENGTH "um";
run_net.lisa
											INCLUDE ("hipex_ex01_opt.lisa");
INCLUDE ("hipex_ex01_net_cmd.lisa");

HIPEX_SUMMARY_PATH                      = "/home/alexa/2020_06/01";
HIPEX_NET_MAIN();